|
About Family UW Photos
Aquashot Trip Reports RSDiver Photo Instruction
Wallpaper Images Software Site Map |
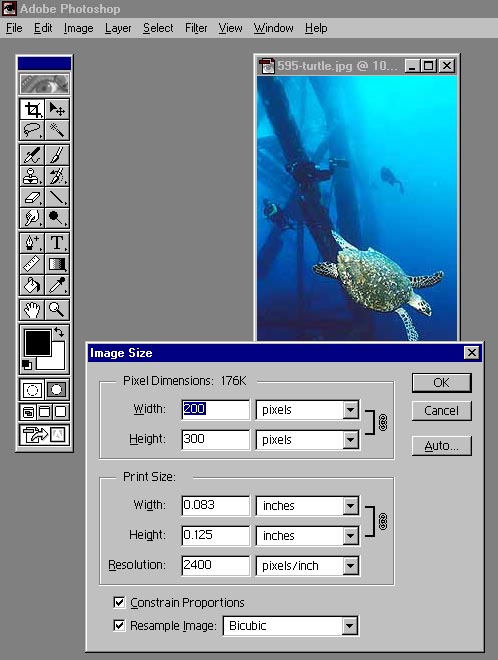
Digital Images and "Resolution"Digital Photographers talk all the time about "resolution," "dots per inch," and "pixels per inch." But many of them are unclear on exactly what these terms mean and how they relate to actual images. This page will try to clear up some common misconceptions. What does the word "resolution" mean?At its most basic, "resolution" refers to whether you can "resolve" details in an image. Historically this has been measured in lines per inch or LPI. The basic idea is to take a picture of a bunch parallel lines and see how closely they can be spaced and still let you distinguish two adjacent lines from each other in the image. There are lots of things that play into the final answer of maximum resolution of a camera system, including (but not limited to) the lens system and the film itself. In a digital camera, of course, the image sensor takes the place of film so you have to account for the 'fineness' of the sensor. The ability of the sensor to resolve adjacent lines is of course directly related to the pixel count of the sensor -- the higher the pixel count, the more sensor elements are preset per inch, so the higher the LPI that sensor can resolve. Let's look at an example. Let's say you have a perfect optical system so the only limitation of a camera system is the sensor. This doesn't really exist, of course, but bear with me. Let's further say that your sensor is 3000 pixels wide and 2000 pixels high and that it measures 1.5 inches wide and 1.0 inches high. How high an LPI can you actually resolve with this sensor? Ignoring the optics (and their resolution, magnification, etc.), if you adjust the system so 3000 vertical lines get spread across the width of the sensor, the image would be solid black. You couldn't resolve any lines, let alone all of them. So try spreading 1500 lines across the sensor...in the perfect world you'd have an image where you'd get alternating vertical lines of black and white, like a zebra. Of course, the world isn't remotely perfect so you won't get this...but you get the idea; 1500 LPI is the best you could do with that sensor. Now let's imagine that we replace that 3000x2000 sensor with a 6000x4000 sensor. Suddenly you could see some white space between the lines at 3000 LPI. Groovy. The 6000x4000 sensor, with twice the pixel density of the 3000x2000, has twice the resolution. Now maybe you see the connection; higher pixel numbers do lead to better resolution, assuming the optics cooperate. So how does this relate to "resolution" as the term is used commonly today? Probably a marketing guy got involved, because the meaning of the word got completely twisted. Somewhere along the way (probably in the 1970s or '80s), people starting talking about the "resolution" of their computer monitors and assigning pixel dimensions to those "resolutions." That is, they started saying things like "my monitor has a resolution of 640x480." The truth is that there is a connection between the pixel size of a screen and the "resolution" of that screen, but really the two concepts should not be used interchangeably. Anyway, in popular lingo you see "resolution" used to refer to the size of the image, either from a digital camera sensor or a video display card in a PC, etc. This is just plain wrong, but it's the way the word is used now. The truth is that "pixel size" is probably a better term for this concept. "Resolution" should be used when referring to the ability of a printer or scanner to resolve details. Resolution should always have a unit in something per unit distance, like "lines per inch" or "dots per inch," etc. Strictly speaking, it really only refers to "lines per inch" but that's just too tough a concept to apply to daily usage. Time to move on. How are "resolution" and "dpi" related?Printer manufacturers often talk about resolution in "dots per inch," which refers to the number of dots the print head can lay down per physical inch of paper. Higher DPI means smaller dots, which in turn means finer detail on paper. There is a distinction between "dots per inch" and "pixels per inch." Inkjet printers, for instance, don't actually produce individual pixels that vary in color. They lay down dot patterns in pixel-sized cells. Each dot in the cell can be only one color: cyan, magenta or yellow. By changing the number of dots of each color the printer fools your eye into perceiving the desired color. You can't resolve the individual dots so your eye averages them together and assigns a single color to the aggregate. It's magic, but it works really well. So: you'll see printers quote "resolutions" in DPI but they never tell you the pixels per inch (PPI) number. That's actually the more relevant number, but it's much smaller than the DPI number so the marketing droids don't like it. The PPI number of an inkjet printer can be as little as a tenth of the DPI number! Some newer printers (HP, most notably) like to talk about the dot size their printers use, instead of quoting a DPI. The dot size is measured in picoliters of ink. As opposed to DPI where higher is better, smaller picoliter numbers are better than larger one. The smaller the picoliter size, the smaller the ink dot on paper. But the real issue here is more complicated: how far apart are the dots, and how much do they overlap? If you have two dots on paper, each 1mm in size, separated by 1mm, then all is well. But if those dots were 2mm in size, the 1mm separation would mean they'd merge together and be difficult to separate visually. So when you want to increase the dots-per-inch number (i.e. space them closer together), you have to decrease the size of the dot. Conversely, decreasing the size of the dot doesn't help if there's nothing but white paper between two "adjacent" dots. When you decrease the dot size, you have to decrease the spacing or you're wasting your time. So picoliters doesn't really tell you the whole story, and neither does dots per inch. You need to know both if you want to compare. Of course, I think HP introduced the idea of picoliters specifically in order to make comparisons difficult, but that's a different story. Back onto the main topic: "pixels per inch" is a term you don't often see, but in fact it is the most precise way to specify performance of scanners. Scanners don't yield "dots" like an inkjet printer does; scanners yield "pixels." There's an inescapable math to scanner resolution. If you scan a 8"x10" photograph at 300 dpi, you will end up with a 2400 pixel x 3000 pixel image...of course, that should read "at 300 ppi," which is the point of this paragraph, but you get the idea. The manufacturers say "dpi" but they really mean "ppi." For the rest of this page, I will use "dpi" interchangeably with "ppi," because that's how most people use it. So what do "resolution" and "dpi" have to do with digital imagery?DPI as a concept is applicable only when you're dealing with a physical input or output device (such as a printer or scanner). You frequently hear people say "screen resolution is 72 dpi" or something similar, but the fact is "that just ain't so." The early Macintosh computers did have a 72 dpi screen, because Apple Computer wanted WYSIWYG to be exactly that. If the image onscreen measured 1 inch, it would print at 1 inch. But Apple could get away with that only because they controlled both the size of the monitor and the pixel resolution of the video card. They knew the monitor was 8 inches across (or whatever it actually was; I'm making up that number), and they then knew that they had to make the video subsystem spread 72x8 = 576 pixels across those 8 inches. Since those days, however, monitors and video systems have not been coupled. You can hook up just about any size of monitor to any video card and it will work. Consider my computer at home, which has a video card running at 1280x1024, displayed on a 19" monitor, whose physical screen dimensions are 14.5" x 11". That makes the effective dpi of my video system 1280 / 14.5 = 88.5 dpi in the horizontal direction, and 1024 / 11 = 93.2 dpi in the vertical direction. Jeepers creepers, my screen at home doesn't even have the same dpi in both directions (this is common for many or even most people, actually)! At work I run the same monitor at higher resolution, namely 1600x1280. That system's effective dpi is 1600/14.5 = 110 dpi horizontally and 1280 / 11 = 116 dpi vertically. The pixels are smaller, but there are more of them on the screen. OK, so how does this relate to digital imagery? Well, let's say I scan a 6" x 4" print at 200 dpi. Then I end up with a 1200 x 800 digital image. It will almost completely fill the 1280x1024 screen at home, but it won't come close to filling my 1600x1280 screen at work -- even though I'm using the same size monitor in both locations. Clearly, "DPI" has no relevance when you're talking about digital images seen on a monitor. The only thing that counts when looking at a digital image on a monitor is the actual pixel size of the image. If the pixel size of the image is smaller than the pixel size of the video card your viewer is using, the image will fit onscreen, no matter what size monitor that person is using. If your image's pixel size exceeds that of the video card, it won't fit onscreen -- again, no matter what size monitor is in use. So saying "monitors are 72 dpi" is just plain wrong, and it's basically a nonsense statement. You're best off forgetting you ever heard it. If you want to share your images with people over the web, you have to pick a pixel size for the image, and forget about things like DPI. What size should you pick? As of the writing of this page, the most common screen size was still 800x600, followed closely by 1024x768...but there are still 640x480 screens running around. I have settled on 600x400 as my standard image size. This lets 640x480 users see the image without scrolling yet still permits reasonable detail in the image. Even though 1024x768 is common, most people running at higher resolutions don't use their browsers at a full screen; they run smaller windows that overlap each other. 600x400 should be usable by everyone, which is my goal. Back to DPI.DPI is a totally relevant concept when scanning or printing, because you're converting between physical dimensions and pixels when scanning, and you convert pixels to physical dimensions when printing. Most scanning software will tag the image with the resolution you picked when you scanned the image. That is, if you scanned 6"x4" at 200 ppi and got a 1200x800 image, the image will come with an "asterisk" that says it was scanned at 200 ppi. If you send that image to a printer, untouched, it should print out at 6"x4", because the printing software sees that "200 ppi" asterisk and processes it accordingly. It's worth noting that the printer has some work to do on its own, because the printer probably only prints at one or two resolutions, and it's almost certain that its native resolution is different from what you've requested with your picture. The printer interpolates the pixels you hand it and prints the interpolated pixels -- so if you send a 1440 dpi printer a 200 ppi image, you get 200 ppi quality, no matter how much better the printer can do! Now comes the fun part. If you open that image in a photo editor, you can change the ppi setting with or without changing the image's pixel size. It's your choice. For instance, Adobe Photoshop's "resize" dialog box has a checkbox labeled "Resample Image." If this checkbox is unchecked, You can type any number you like into the "resolution" edit box, and Photoshop won't do anything other than change the "asterisk" value that says what the image ppi is. Take a look at the screenshot below, and you'll see that Adobe is quite precise (and correct) in their usage of terms. The top group of controls in the dialog box is labeled "pixel dimensions," and that's where you'll find the pixel sizes for the image. The bottom group of controls is labeled "print size," and that's where you change the ppi resolution of the image. Also note that Photoshop lets you change the width and height (both in pixels and ppi) separately if you want, or it maintains the current ratio for you. If you want to distort the image, just uncheck "Constrain proportions" and you're ready to go. BTW, the ratio between height and width is called the "aspect ratio," but we'll talk about that term some other time.
Anyway, there are a couple of things to note about this image, as an example. I scanned it from a negative, at 2400 ppi. My original scan was 2400x3600 in size, and then I resized that down to 200x300 so I could use it as a thumbnail image on my web pages...but I didn't change that 2400 ppi tag, so my 200x300 image would print at 1/12 inch by 1/8 inch! The original image, scanned at 2400 ppi, would have printed out at 1"x1.5", because that's the size of the original negative! But that's a much finer image than my printer can handle, and who would want a 1"x1.5" print anyway? So I could take that 2400x3600 scan and change its ppiI to something reasonable, say 300 ppi, and end up with a 2400/300 x 3600/300 or 8"x12" print...All without changing anything about the image other than its stated ppi. Conversely, I could change the 200x300 image's ppi setting to 25 ppi and end up with an 8"x12" print again. Of course, that print would have visible pixels the size of rice grains, but that's a different story. But what size should my pictures be?Now we're ready to get down to the meat of the subject. You have a huge scan (or digital camera image), and you want to share it on the web. What should you do? Open it up in Photoshop or whatever image editor you use, and resize the image to your target pixel size. Don't change the image ppi (as we already know, that's irrelevant), but rather change the actual pixel size. In the Photoshop example above, type 600 into the "width" edit box in the "pixel dimensions" section, and 400 into the "height" edit box in the same section. Of course, use whatever values you really want; 600x400 is just what I suggest. OK, you want to print that image? Well hopefully you saved the original high-res copy of the image. The easiest thing to do is to open it in Photoshop and set the width (or height) in the "print size" section, and let Photoshop calculate the other dimension for you. If you want a 6"x4" print and typing 6 into the width box gets you 4.27 in the height box, you have three choices. One is to crop the original image to bring it back to size in the height dimension. This is probably the best option. Another option is to leave it alone, print the thing, and then trim the paper by hand. The final option is just to deal with the odd-sized print. If, on the other hand, you got 3.89 or some other number less than 4, the thing to do is type '4' into the height box and then some number larger than 6 will come out in the width. Then you have the same three options for fixing the oversize problem. Finally, some advice on printing images: less than 200 ppi usually results in visibly grainy or distorted images. It's best to stick with resolutions higher than this. You can go a littler lower than 200 ppi if you have to, but I don't recommend it. There is a practical implication for this: if you own a digital camera, the pixel size of the image directly affects how large a print you can make from the image. For instance, that 3.3 MP camera at 2048x1600 can, roughly speaking, make a 10"x8" print. Sure, you can print larger sizes, but as mentioned, it can look pretty ugly before you're done. Can you resize an image to make it larger? Not really. Yes, you can do it, but Photoshop won't do a job much better than your printer will. There is software (Real Fractals, for instance), that claims to be able to enlarge images effectively, but I have not been too impressed with the results. It can't hurt to try it if something like that came with your camera, but I wouldn't be too hopeful. File SizesThis is a source of much confusion, especially since the graphic arts world likes to quote image sizes in megabytes. Here's the skinny. Images actually have 3 numbers that affect the size of the file. They are: pixel width, pixel height, and bit depth. We haven't talked about bit depth. Bit depth refers to the number of bits used to represent each color in every pixel. Every pixel in a 'normal' digital image consists of three colors, namely red, green, and blue. Each pixel actually consists of 3 numbers, one for each of R,G,B. Bit depth describes the range of values available to describe those colors. Basically, more bits is better. with 8 bits, you get 256 possible values of each color. With 10 bits, you get 1024. With 12 you get 4096. With 14 you get 16384. You get the idea. More choices means finer control over the tones of the image. There are two main ways of specifying bit depth. One is to quote a total number of bits for each pixel, as in "24-bit color" or 24 bpp ("bits per pixel"). In this case, you get 8 bits for each color, which yields 256*256*256 or ~16 million possible colors for each pixel. In general, this is "good enough." Another common way is to specify the bit depth for each R/G/B component. You'll see this quoted like "14 bits per color," or sometimes as "bit depth: 14" or even "14-bit ADC." Keep in mind that 14-bit depth is the same thing as "42 bpp" (3x14 = 42). But you can't actually use all those colors, as most people (including you, probably) have 24-bit video cards. 32-bit video cards are common, too, but the reality is that they are almost always use 24-bit display hardware that either ignores the remaining 8 bits or uses it for transparency ('alpha') information. Either way, Photoshop will have to interpret those extra bits before displaying onscreen. So how does this affect file size? Well, let's look at an example of an uncompressed image. Let's say that we have a 3.3 MP digital camera at 2048x1600x24-bit. Uncompressed images from that camera will weigh in at 2048 pixels x 1600 pixels = 3,276,800 pixels. Each one of those pixels will take up 3 bytes (24 bits = 3 bytes), so the actual image size will be 9,830,400 bytes, or 9.375 MB (note that 1 MB = 1024 * 1024 bytes = 1,048,576 bytes) That's huge! Fortunately, JPEG image compression comes along to save the day. JPEG is usually good for a factor of 10 to 20x compression, so those 9.4 MB files will end up in the 500 kB to 1 MB range. But it gets a little weirder. You can buy 42-bit flatbed and film scanners, so the "3 bytes per pixel" formula ends up being unreliable. Worse still, Photoshop only has two modes: 8 bits per channel and 16 bits per channel (i.e. 24 bits per pixel or 48 bits per pixel). So once you exceed 24-bit color, you go directly to 48-bit color, even if the extra bits aren't used. So once you exceed 24-bpp scans, the raw image size instantly doubles -- Photoshop uses 6 bytes per pixel instead of 3! That's where you see scanners claiming to deliver "100 MB" files. Take Nikon's 4000 ED scanner, which does 4000 dpi @ 42 bpp. A 35mm negative (1" x 1.5") will deliver a 4000 x 6000 scan, which is 24 million pixels. Then you get 6 bytes per pixel, and the final raw image will weigh in at 144 MB! Ouch! Regardless, by the time you write a JPEG, you have to drop back down to 24 bpp, but those 48 bpp scans are a great place to start. So that's the end of this page. Hopefully by now you understand the ins and outs of pixel sizes, DPI resolution, and printing & sharing digital images. Good luck!
|
|
||
About | UW Photos | Scuba Picture Uv the Day | Flower Gardens | Aquashot | Trip Reports | RSDiver | Photo Instruction | News | Desktop/Screensaver Images | Site Map |
||