|
About Family UW Photos
Aquashot Trip Reports RSDiver Photo Instruction
Wallpaper Images Software Site Map |
Wide Angle Techniques (Reefscapes)Note: this section is not yet complete. Please check back later. By "reefscape" I mean a wide-angle photo in which the reef makes a prominent appearance. You've probably seen lots of these pictures. Some people call them "panoramic" photos. Some call them "underwater landscapes." I call them "reefscapes." There are basically three situations in which you'll shoot a reefscape, and the technique varies a little from situation to situation. The three situations are:
We'll cover the three situations in that order. Reef as Subject
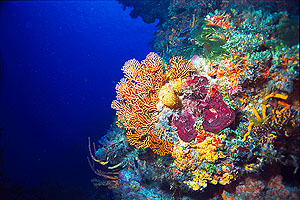
This is the most difficult of the three situations, because it means that you have chosen to make the reef itself the primary subject of the picture. Framing can be challenging, lighting is critical, and subject choice will make or break the photo. You have to fire on all cylinders to pull off this type of photo. However, when you do succeed, the results can be breathtaking.
Equipment requirements are straightforward, but that doesn't mean they're easy. You'll need a wide-angle lens -- the wider the better, preferably a 20mm lens (or shorter) in a housing or a Nikonos 15mm lens (or shorter). You'll also need a strobe capable of lighting that lens's field of view. There are only a few strobes available that are powerful enough to deliver the light required. They include the Ikelite SS-200 and SS-400, the Nikon SB-104, and the Sea & Sea YS-320. The critical features of any strobe you might use are coverage angle and total power. More of both is better. :) You can use "narrower" strobes by mounting a diffuser on them, but the effective power output will decrease when you do this. It's best to get a strobe wide enough and powerful enough to cover your lens and light the scene sufficiently. Let's start with subject selection. This is arguably the most important step in this type of photo. If you pick a dull subject, you won't get a great picture no matter how well you do everything else. The ideal subject is (a) big, (b) colorful, (c) entertaining or interesting, and (d) distinct from the rest of the reef. Let's reorganize those into an easily-remembered acronym: ABCDE for "A Big, Colorful, Distinct, Entertaining subject." Most reefs have something you can use: a big sponge, a big sea fan, a large swim-through, etc. These are all good choices for subjects.
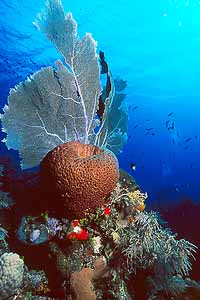
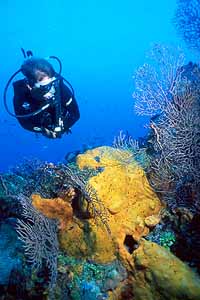
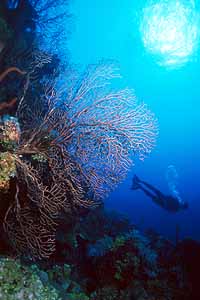
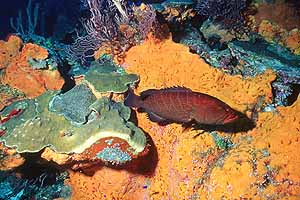
Just because the reef itself is the focus and you have picked out a good subject, don't ignore the possibility of adding to it.. Adding a diver is a great way to provide some other visual interest and/or a visual cue about the size of your subject.
How to work with divers in your picture is a subject for a different section, so I'm not going to go into detail on that topic now. The three pictures above show three different ways to use divers in your photo. In the first photo, the diver is an important part of the frame, but clearly she is not the main subject. In the middle photo, the diver and the sponge & fan reef segment are equally important. Your eye might reach for the diver initially, but the color of the sponge will probably draw you in immediately after that. In the rightmost photo, the fan is clearly the major subject, and the sunburst probably comes in second. The diver is merely an ornament, although he adds a nice touch to the picture. Some composition ideas for you: (1) As mentioned, consider whether adding a diver would be beneficial to the picture. (2) You're best off aiming towards the surface for better lighting in the background water. The farther "up" you aim, the brighter the water will be. Aim far enough up and you can actually add the sun as a compositional element. You can also run into Snell's Window (definition, description) , which will probably distract attention away from your main subject. Be wary of the appearance of Snell's Window in your photos. Also, remember to consider "vertical" framing, especially when shooting walls. The vertical nature of walls fits perfectly with vertical frames. Also, vertical frames cover a greater range of depths, which allows your viewers to see a variation in color from the surface to depth. This gives some visual cues about your depth, and also breaks up the monotony of a solid blue background. As far as exposure control goes, you are almost certainly going to have to put your strobe in manual mode. This, in turn, means most likely operating your camera in 'A' mode. Details of all this are beyond the scope of this page, but you can find help in Exposure 101. Reef as SettingIn this type of photo, you have probably picked out a subject (such as a large fish) that is near the reef. Rather than try to isolate the subject from the reef, you can use the reef as a setting, providing a sort of visual "home" for the subject. In this case, you want to maximize the visual impact of the reef without overwhelming your subject.
As far as equipment goes, lots of different lenses are usable, although in general you will get better results with shorter lenses, as they will let you see more of the reef. Of course, shorter lenses means choosing larger subjects, so make sure you think about the length of your lens when choosing subjects. Also remember that moving closer to the subject is always an option, as long as you can do so without spooking the subject.
The
important things to remember for this type of picture are to make sure that
you get enough of the reef in the frame that the viewer will recognize it, and
that you don't cut off a strong reef feature with the side of your frame. For
example, look at the two following pictures.
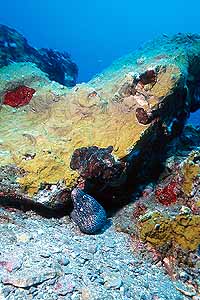
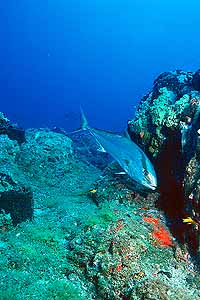
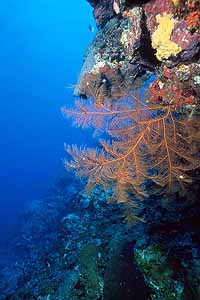
The left-hand picture makes it pretty easy to recognize that the moray is peeking out from under a rock. The right-hand picture, however, should have been framed a little more to the right, as this would have let you see what was next to the jack. In addition, framing a little to the right would have avoided cutting off the hogfish on that side of the frame. This type of photo requires some thought and observation on your part. Don't just snap away at the subject without considering what is nearby and around it. Exposure can be tricky as well. You're probably best off in manual strobe mode, but you might get away with TTL if the reef is close to the subject. In any event, you do want the reef to be close to the subject so that they will get roughly equal lighting from your strobe. This can make shadows intrusive (see the first picture in this section) unless you have two strobes, but if you have only one strobe you'll have to make do. Reef as BackgroundThe goal in these pictures is to place the reef in the background as a compositional element, but not as any sort of subject. As such, your job is a little easier because you're not worried about lighting the reef and you're not too concerned about what reef features might or might not be in the frame. When you shoot this sort of picture, the reef will be located <b>behind</b> your subject, farther away from the subject than the subject is from you. That is, if your subject is 5 feet from you, you want the reef at least 10 feet from you. If your subject is 3 feet away, the reef should be at least 6 feet away. Why? Because you want the subject to be the large item in the frame, and the reef to be small. Doubling the subject distance will do this. In addition, you probably want the reef to be slightly out of focus, and you definitely want it to be "blue." If the reef is twice as far away as the subject, it will get 1/4 the strobe light the subject gets, and that light will be bluer than what the subject will get. Remember: your goal is to separate the subject from the reef. If you want the reef to be a major part of the photo, go back to the previous section on this page.
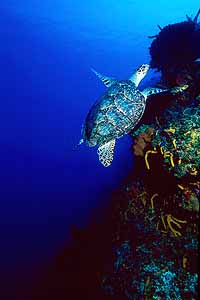
In the left-hand picture, the reef behind the turtle is clearly part of the background. Yes, some of the nearer portions of the reef provide a little color, but the rest of it provides only shapes and structure, mostly in silhouette. This makes the reef part of the background rather than part of the subject or setting. The reef has become negative space in the frame. The right-hand picture is a strange sort of combo picture. The reef is both subject and background. The black coral in the front (along with the encrusting sponges) is the subject, but the sloping wall behind it is background. That's about it for reef-as-background. Just remember to get your ambient lighting correct and all will be well. Back to Techniques | Forward to Divers
|

|
||
About | UW Photos | Scuba Picture Uv the Day | Flower Gardens | Aquashot | Trip Reports | RSDiver | Photo Instruction | News | Desktop/Screensaver Images | Site Map |
||